
Plasma cutters are essential tools in modern fabrication, allowing precise cutting of electrically conductive metals while improving workflow efficiency and material handling.
However, even a well-designed plasma cutter can underperform or create scrap if it’s not operated correctly. Mistakes in torch handling, improper setup, or ignoring basic operational checks can slow production, increase material waste, and create safety risks.
Using a plasma cutter effectively is not just about technical skill; it’s about ensuring predictable output, reducing downtime, and maintaining consistent quality.
To stay efficient, fabrication managers, plant heads, and operations teams must know the critical steps, safety measures, and operational best practices for plasma cutting. This guide explains how do you use a plasma cutter, with actionable steps that help keep your metal cutting projects precise, safe, and cost-effective.
Key Takeaways:
Inspect torch consumables like tips, electrodes, and nozzles before each session to maintain consistent performance and prevent downtime.
Keep amperage and air pressure settings stable to ensure a steady plasma arc and high-quality cuts.
Maintain a clean, organized workspace and securely attach the ground clamp to reduce operational risks and improve accuracy.
Follow a consistent workflow, including cleaning, inspections, and careful operation, to prevent small issues from escalating.
Operate the plasma cutter properly to achieve precise cuts, reduce scrap, and support long-term equipment performance.
How Plasma Cutters Work: Key Insights for Efficient Operation?
A plasma cutter uses ionized gas to slice through electrically conductive metals efficiently. The plasma stream melts the metal while high-speed gas removes the molten material, delivering clean, precise cuts without slowing production or risking material damage.
For operations leaders, understanding plasma cutting isn’t just technical, it directly affects key KPIs such as equipment uptime, scrap rate, throughput, and lead time stability. By using plasma cutting effectively, you can maintain smooth production while protecting both the material and your equipment.
Before using a plasma cutter, it’s essential to understand its benefits for both operators and overall operations. Learning plasma cutting equips your team to:
You can handle metal projects safely and efficiently, reducing the risk of accidents or operational delays.
Plasma cutting allows you to achieve consistent, precise cuts that enhance overall fabrication quality.
Using proper techniques helps you avoid mistakes that can increase scrap or cause downtime.
Plasma cutting saves time compared to traditional methods like saws or oxy-fuel torches, improving throughput
By grasping these advantages early, teams can immediately impact production efficiency and reduce avoidable risks.
To operate a plasma cutter effectively, you first need to understand its main components. Each part plays a critical role in ensuring smooth and predictable operation:
Component | Role in Operation | KPI Impact |
Torch | Directs plasma arc for precise cutting | Reduces scrap and improves cut accuracy |
Electrode & Nozzle | Focuses plasma for consistent quality cuts | Maintains first-pass yield and precision |
Air or Gas Supply | Clears molten material and stabilizes the plasma stream | Ensures smooth operation, reduces downtime |
Power Supply | Converts electricity into the arc | Supports consistent performance and uptime |
Ground Clamp | Completes the electrical circuit safely | Protects equipment and operators, prevents faults |
For reliable plasma cutting results, Cutting Edge Plasma supports structured workflows and best practices. Machines like Hypertherm Powermax125, Hypertherm Powermax105, Hypertherm Powermax85, Hypertherm Powermax65, Hypertherm Powermax45.
Maintain consistent arcs, reduce material waste, and extend consumable life. Optimized setups and cleaner workspaces allow longer, uninterrupted operations, helping teams achieve precise, predictable, and efficient cuts every time.
Understanding these components is the first step toward safe operation and predictable output. Once you know how each part contributes to performance, you can operate the cutter efficiently, prevent errors, and maintain equipment longevity.
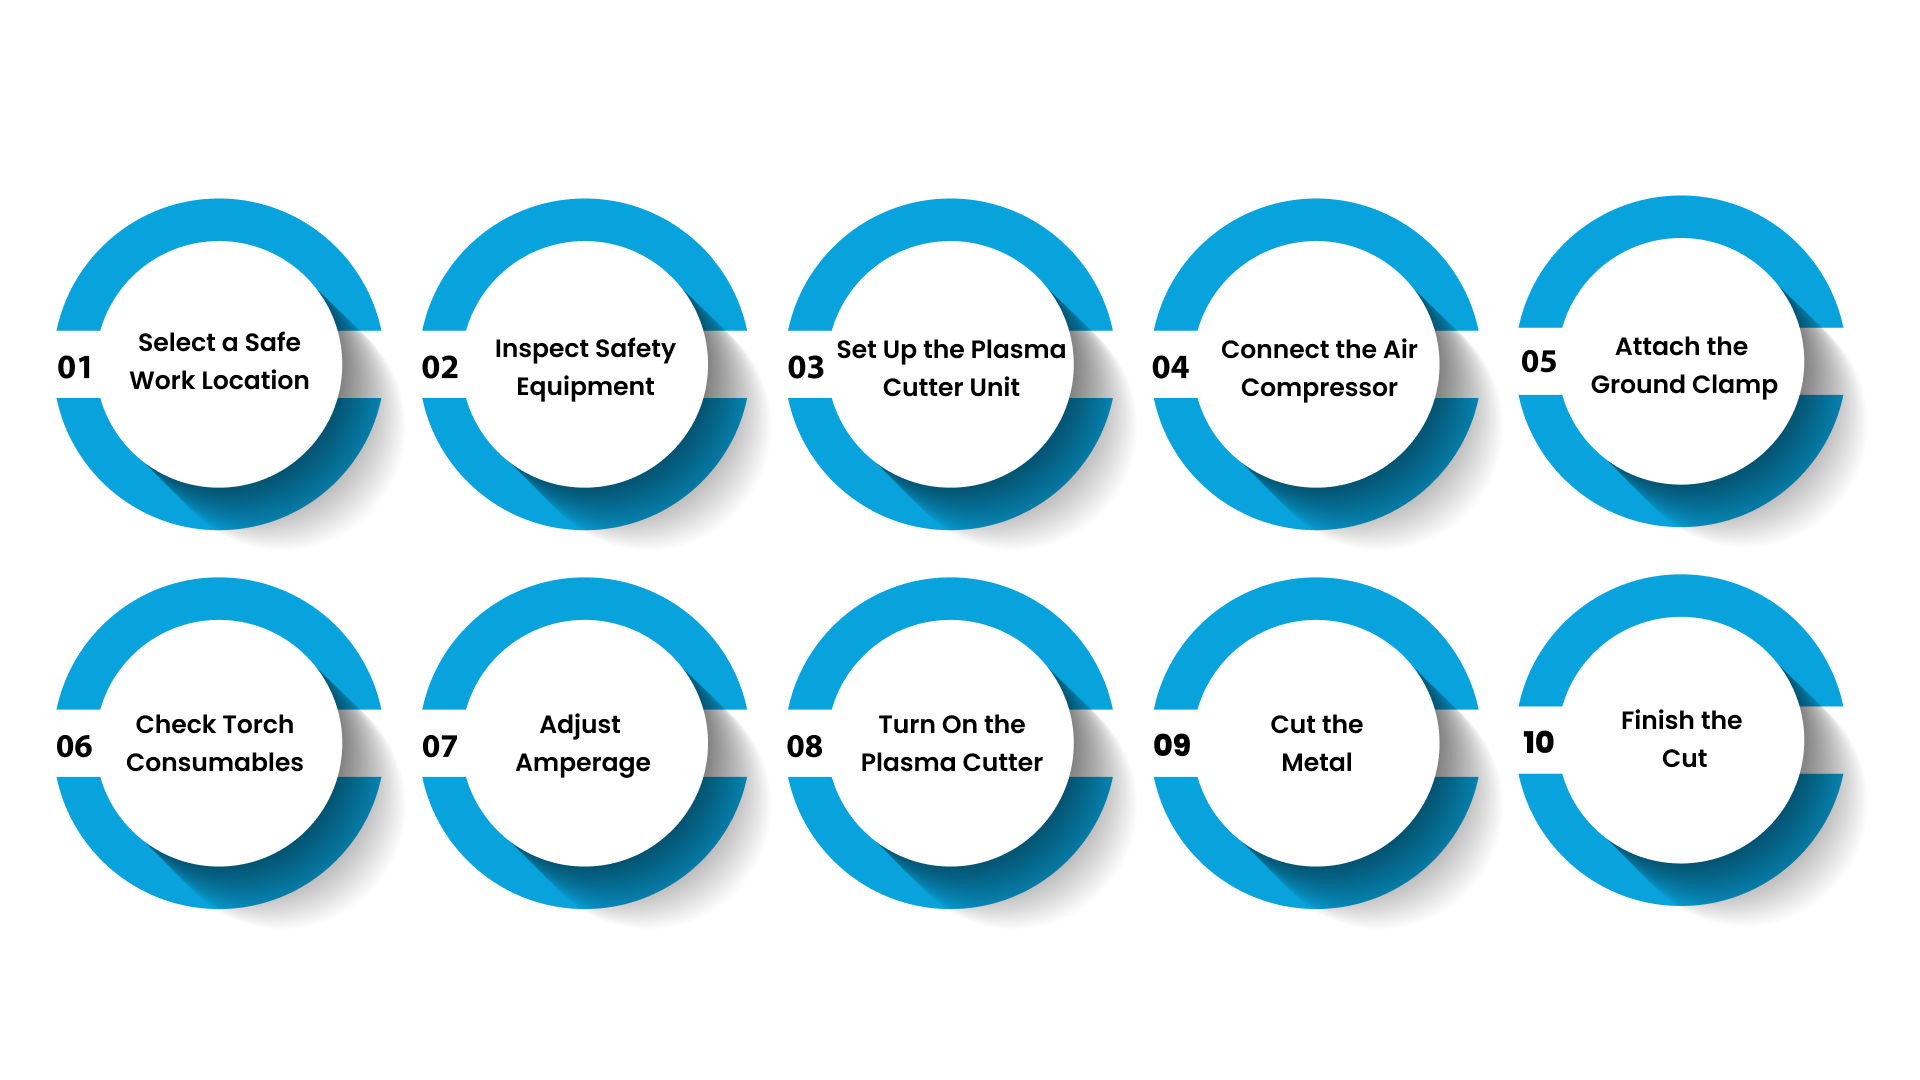
10 Practical Steps on How to Use a Plasma Cutter
If you’re just starting with plasma cutting, it might seem intimidating. But with the right approach, safety mindset, and setup, you can make precise cuts without wasting material or damaging your equipment.
Here’s how to approach how to use a plasma cutter effectively, from preparing your workspace to finishing your cut:
1. Select a Safe Work Location
Your work area sets the stage for every cut you make. A safe and organized location not only protects you but also ensures your cuts are consistent and reliable.
Steps to Follow:
Pick a clean, flat, and uncluttered space to reduce the risk of trips or accidents.
Make sure the area is well-ventilated to clear smoke and fumes.
Check that lighting is sufficient to maintain accuracy throughout the cutting process.
Remove any flammable materials from the workspace to prevent fire hazards.
Why It Matters: A well-prepared workspace keeps you and your team safe, improves cut precision, and ensures your workflow stays uninterrupted.
Challenges: Smoke buildup can make it difficult to see the cutting line clearly. Uneven or cluttered areas can lead to misaligned cuts or accidental tip misfires.
Best Practices:
Set up a dedicated plasma cutting zone to keep everything organized.
Use fans or smoke extraction systems to maintain clear visibility.
Arrange all tools and materials before starting your cut to stay efficient and reduce risks.
2. Gather and Inspect Safety Equipment
Once your workspace is ready, it’s time to focus on your safety gear. Proper protective equipment is your first line of defense; without it, even a small slip can lead to injury or costly downtime.
Steps to Follow:
Ensure you have a welding helmet or face shield for eye and face protection.
Wear gloves, a protective apron, and long sleeves to shield your skin.
Use safety boots and eye protection to guard against sparks and debris.
Keep a fire extinguisher within reach in case of emergencies.
Why It Matters:
Wearing the right gear protects you from burns, sparks, and other hazards. It also ensures uninterrupted work by preventing injuries that could stop production.
Challenges:
Worn-out or damaged PPE can fail when you need it most, increasing the risk of accidents. Skipping safety checks can also lead to serious injuries or regulatory issues.
Best Practices:
Inspect all safety equipment before every session to catch any wear or damage. Replace any compromised gear immediately. Make sure everyone in your workshop knows how to use PPE correctly and keeps it accessible.
3. Set Up the Plasma Cutter Unit
Now that you’ve gathered your safety gear, the next step is setting up your plasma cutter properly. This ensures smooth operation and reliable cuts while protecting both you and your machine.
Steps to Follow:
Place your plasma cutter on a stable, level surface to keep the torch steady.
Check all cables, connectors, and hoses for any signs of wear or damage.
Make sure the machine is clean, free of dust, metal debris, or leftover slag from previous cuts.
Position the cutter, such as Hypertherm Powermax125 on a stable surface, inspect cables and hoses, and clean the machine to avoid misfires.
Why It Matters: Proper setup reduces misfires, lowers scrap, and helps your consumables last longer. It also keeps your workflow predictable, avoiding interruptions that slow production.
Challenges: An uneven or unstable surface can make the torch wobble, leading to poor cut quality. Dirty or damaged connections can cause inconsistent arcs or even machine faults.
Best Practices:
Keep a dedicated spot for your plasma cutter to ensure stability. Clean the machine before each session and inspect all connections regularly to catch small issues before they become big problems.
4. Connect the Air Compressor or Gas Supply
After setting up your cutter, the next step is ensuring your air or gas supply is ready. A steady supply is crucial because it keeps the plasma arc stable, ensuring smooth cuts and preventing unnecessary wear on your torch.
Steps to Follow:
Hook up the recommended air source, whether it’s a compressor or a gas cylinder.
Inspect all hoses and fittings for leaks, cracks, or other damage.
Adjust the pressure based on your machine’s guide for the specific material you’re cutting.
Why It Matters: A consistent air or gas supply helps maintain precise, clean cuts and protects your torch from damage caused by unstable arcs or interruptions.
Challenges: Low or fluctuating pressure can make the arc waver, leading to uneven cuts. Loose or damaged connections can spark or reduce cut quality, slowing down your workflow.
Best Practices: Always test the pressure before you start cutting. Keep connections secure and inspect hoses frequently. It’s smart to have a backup supply handy so a leak or pressure drop doesn’t derail your work.
5. Attach the Ground Clamp
Following the setup of your air or gas supply, the next step involves securing the ground clamp. A solid ground connection is essential because it completes the electrical circuit, ensures safety, and keeps the arc stable throughout the cut.
Steps to Follow:
Attach the clamp to a clean, bare metal surface.
Make sure the connection is tight and doesn’t shift while you work.
Confirm that the clamp stays stable as you move across your cutting line.
Why It Matters: A firm ground connection keeps the arc consistent, reduces sparks, and protects your torch from issues caused by unstable electrical flow.
Challenges: Weak or loose grounding can make the arc fluctuate, leading to rough or uneven cuts. Poor contact may also strain your consumables or interrupt your workflow.
Best Practices: Always check the clamp before you start cutting. Reposition it to unpainted metal if the contact isn’t solid. Keep an eye on its stability throughout the process to maintain smooth and safe operation.
6. Install or Check Torch Consumables
With your ground connection secured, the next step is making sure your torch consumables are ready. Consumables like tips and electrodes play a major role in how clean your cuts look and how long your torch lasts, so keeping them in good condition helps you work smoothly and avoid unnecessary scrap.
Steps to Follow:
Examine each consumable for signs of wear, burning, or damage before you begin.
Install the parts exactly as instructed to ensure a snug, reliable fit.
Follow a regular replacement schedule so your cut quality stays consistent.
Why It Matters: Keeping your consumables in top shape ensures cleaner cuts, reduces waste, and helps your torch run longer without sudden issues.
Challenges: Worn or damaged tips can cause jagged edges or inconsistent arc performance. Incorrectly installed parts might lead to arc interruptions, torch strain, or unexpected downtime.
Best Practices: Store extra consumables so replacements are always within reach. Clean the parts routinely to remove buildup that affects performance. Swap them out early if you notice a decline in cut quality to maintain smooth, dependable operation.
7. Adjust Amperage and Air Pressure Settings
After confirming your consumables are in good shape, you’re ready to dial in the right amperage and air pressure. These settings determine how cleanly you cut, how efficiently your torch performs, and how well the material responds during the process.
Steps to Follow:
Choose the amperage based on the metal you’re cutting and its thickness.
Set the air pressure to keep the arc steady and controlled.
Run a quick test on a scrap piece to confirm everything feels right before moving to your actual workpiece.
Why It Matters: Proper settings help you achieve accurate, smooth cuts while reducing waste and preventing unnecessary stress on your torch.
Challenges: High amperage can burn through thin material or cause excessive dross. Low air pressure may lead to rough edges, uneven cuts, or arc instability.
Best Practices: Refer to your machine’s guidelines for recommended values. Keep simple notes for different materials so you can switch settings quickly in the future. Make adjustments gradually during your test cuts until the arc feels balanced and controlled.
8. Turn On the Plasma Cutter and Prepare to Cut
As soon as your settings are locked in, you’re set to turn on the cutter and bring your torch into position. This careful start boosts accuracy and keeps your workflow smooth.
Steps to Follow:
Turn on the plasma cutter as guided by your machine’s manual.
Hold the torch at a stable angle while keeping a steady distance from the metal surface.
Give thicker materials a quick preheat to help the arc stabilize before you start cutting.
Why It Matters: Starting correctly helps you maintain accuracy, prevent arc issues, and keep your operation running without interruptions.
Challenges: An incorrect torch angle can leave you with uneven or slanted edges. Skipping the preheat on thick materials can cause the arc to drift or cut inconsistently.
Best Practices: Keep your grip steady and maintain the same angle throughout the cut. Watch the arc behavior before committing to longer passes. Take a moment to practice on scrap pieces to build confidence and refine your technique.
9. Cut the Metal
When your torch is in position and the arc is steady, you’re all set to make the cut. Working with a calm, steady pace ensures cleaner results and keeps unnecessary rework out of your way.
Steps to Follow:
Guide the torch smoothly along your planned cutting line.
Adjust your travel speed based on the metal thickness and how stable the arc feels.
Use straightedges, guides, or jigs when working on curves or detailed shapes.
Why It Matters: A controlled approach helps you save material, reduce scrap, and achieve consistent results across every project.
Challenges: Rushing through the cut can leave you with jagged edges or burn marks. Skipping guides on detailed shapes may cause slips that lead to extra grinding or complete recuts.
Best Practices: Map out your cut path before you start. Maintain a constant pace that keeps the arc steady. Follow the “measure twice, cut once” mindset to ensure your final piece matches your design.
10. Finish the Cut and Power Down Safely
Finally, once the cutting is done, wrapping up the process properly helps protect your machine and keeps your workspace ready for the next job. A careful shutdown also prevents unnecessary wear and ensures you're set up for smooth operation the next time you cut.
Steps to Follow:
Power down the machine using the manufacturer’s recommended sequence.
Check the finished piece for sharp edges and handle it with care.
Clear the table, remove slag or metal dust, and inspect your consumables for wear.
Why It Matters: A thoughtful shutdown supports longer machine life, reduces unexpected damage, and keeps your work area clean and efficient for future jobs.
Challenges: Leaving metal debris behind may scratch the table or interfere with your next cut. Overlooking worn consumables can cause poor performance the next time you use the machine.
Best Practices: Wipe down your cutter and workspace after every session. Store consumables neatly so they stay clean and dry. Make a quick note of any issues you notice this makes future maintenance faster and more accurate.
Safety Protocols Every Operator Must Follow Before Using a Plasma Cutter
Once you understand the basic steps of using a plasma cutter, applying safety practices becomes critical. Following these precautions ensures operations stay smooth, downtime is minimized, and scrap rates remain low.
Key safety practices include:
Wear Protective Gear: Always use gloves, long sleeves, safety goggles, and a welding helmet with the correct shade. This reduces the risk of burns and eye injuries, keeping your team and operations safe.
Ensure Adequate Ventilation: Maintain airflow around the cutting area to prevent inhalation of fumes. Clean air supports uninterrupted production and protects worker health.
Maintain Fire Safety: Keep flammable materials away from the cutting zone. This lowers the risk of workplace fires that can halt operations and damage equipment.
Properly Attach Ground Clamp: Securely connect the ground clamp to the workpiece to complete the circuit safely. Reliable grounding prevents electrical hazards and avoids potential equipment downtime.
By prioritizing safety after learning the operational steps, you can reduce accidents, maintain consistent throughput, and protect both personnel and equipment.
Operate Your Plasma Cutter Safely and Efficiently with Cutting Edge Plasma
If you want to run plasma cutting operations efficiently and safely, our Cutting Edge Plasma machines are designed to simplify your workflow and deliver consistent results. Our systems focus on precision, operator safety, and reliable daily performance.
Here’s how our features support a smooth plasma cutting process and guide you in how to use a plasma cutter effectively:
1. Integrated Torch Height Control (THC)
Our THC keeps the torch at a consistent distance from the material throughout the cut, ensuring top-quality results and longer consumable life. It works especially well on bowed, warped, or corrugated material, helping you achieve precise cuts without constant adjustments.
2. THC Anti-Dive
When slowing down for corners, holes, or cut ends, our THC Anti-Dive prevents the torch from diving into the material. This ensures accurate cuts and protects consumables while maintaining clean edges on complex shapes.
3. MyPlasma CNC Motion Control Software
Our Windows 11–compatible MyPlasma software includes built-in CAM tools, letting you adjust cut paths, feed rates, offsets, and lead-ins without external programs. It sends all G-code to the controller before cutting, reducing interference and keeping your workflow smooth and efficient.
4. Waterbed
Our integrated waterbed reduces smoke and dust, keeps your workspace cleaner, and cools the material to minimize warping. This feature supports both operator safety and consistent cut quality.
5. Lifetime Tech Support and Warranty
We provide ongoing guidance to help you operate the machine safely and accurately. Our one-year warranty covers electronics and workmanship, giving you confidence and peace of mind while running daily operations.
When you choose Cutting Edge Plasma, you simplify how to use a plasma cutter, maintain safe operations, reduce downtime, and achieve consistent cut quality. Features like THC, Anti-Dive, intuitive software, and a cleaner workspace make it easier for you to work efficiently and confidently.
Conclusion
When you know how to use a plasma cutter machine properly, it helps you protect your equipment, reduce scrap, and keep production consistent. By setting up the machine correctly, checking consumables, and handling the torch with care, you keep cutting cycles smooth, extend tool life, and maintain reliable performance even during demanding jobs.
With Cutting Edge Plasma machines, you can simplify these routines. Features like integrated torch height control, anti-dive technology, and intuitive software help you maintain precision and stable daily output.
Take control of your operations and contact Cutting Edge Plasma now to learn how to operate CNC plasma cutting machine safely and efficiently.
FAQs
1. How do you use a plasma cutter safely?
Always inspect safety gear, check that the workspace is clear, and ensure proper grounding. Following plasma cutter safety protocols reduces scrap, prevents equipment damage, and protects operators.
2. What are the common mistakes when using a plasma cutter?
Skipping consumable checks, incorrect amperage or air settings, unstable surfaces, and poor grounding can cause inconsistent cuts, downtime, and increased scrap.
3. How often should torch consumables be replaced?
Check consumables before each session and replace worn components. Regular replacement supports a stable plasma cutting process and maintains cut quality.
4. Can plasma cutting reduce scrap rates?
Yes. Proper setup, consistent torch handling, and correct amperage and air pressure minimize waste, improve throughput, and protect the machine.
5. How do environmental and operational factors affect plasma cutting?
Dust, moisture, poor ventilation, or inconsistent torch angle can disrupt the plasma cutting process, increase consumable wear, and reduce cut precision. Controlled conditions ensure reliable performance.