Router tables are essential tools for woodworkers, allowing precise shaping, cutting, and finishing of wood pieces while improving workflow efficiency and project quality.
However, even a high-quality router table can underperform or produce errors if it’s not set up or used correctly. Mistakes in fence alignment, improper bit installation, or ignoring safety precautions can lead to uneven cuts, damaged workpieces, and safety hazards.
To stay efficient, woodworking enthusiasts, workshop managers, and hobbyists must know the critical steps, safety measures, and operational Advanced Tips: for router table use.
This guide explains how do you use a router table, with practical steps to help keep your woodworking projects precise, safe, and enjoyable.
Key Takeaways
Inspect router bits for sharpness and proper installation to ensure cuts are clean and precise, reducing the need for rework.
Adjust the fence alignment and set the bit height carefully to achieve consistent edge profiles and maintain accuracy across multiple pieces.
Use feather boards, push sticks, or jigs to guide the material safely, improving control and reducing the risk of mistakes.
Follow a structured workflow that includes setup, safety checks, and finishing to maintain efficiency and minimize errors.
Operate the router table effectively to conserve material, maintain high cut quality, and extend the life of your equipment.
With these basics in place, you’re ready to explore the system components that make accurate routing possible.
How Router Tables Function for Reliable Woodworking Performance?
A router table keeps the router fixed in position while the bit spins and the wood moves across it. This controlled setup improves precision, repeatability, and overall workflow stability.
Before you learn how to use a router table woodworking, it helps to see how the system supports accuracy and daily efficiency.
Using a router table the right way allows you to:
Cut and shape wood with consistent accuracy, reducing avoidable rework and scrap.
Produce multiple identical pieces without constant measuring or adjustments.
Finish edge profiles and joinery faster compared to handheld routing.
To work confidently and avoid errors, it is important to understand the core components and how each one contributes to the process.
Component | Role in Operation | Why It Matters |
Router Motor & Bit | Spins to cut or shape wood | Determines cut style, finish quality, and precision |
Tabletop | Supports the wood on a flat surface | Helps maintain stability and reliable cutting height |
Fence | Guides the wood past the bit | Ensures straight cuts and consistent alignment |
Insert Plate | Holds the router securely in the table | Controls bit height and prevents vibration |
Miter Gauge Slots | Supports angled cuts and crosscuts | Enables accurate specialty cuts when needed |
Maintaining smooth and precise woodworking operations requires more than routine upkeep. Cutting Edge Plasma helps ensure dependable performance by promoting structured workflows and proven best practices.
Models like the Lockwood PRO 5100 CNC Router, Lockwood PRO 4800 CNC Router, and Lockwood PRO 4400 CNC Router deliver consistent results, with features like adjustable cutting height for accurate cuts and anti-dive technology to prevent tool plunges.
A well-organized workspace allows longer, uninterrupted sessions. These solutions provide reliable output, uniform quality, and fewer unexpected stoppages, keeping your projects running efficiently.
Knowing how these parts work together helps you operate the router table efficiently, reduce mistakes, and protect your equipment during everyday use.
How to Use a Router Table Woodworking for Reliable Performance? 10 Key Steps
Once you know how the router table works, the next step is learning the correct sequence of operations. A careful setup prevents alignment errors, avoids unnecessary downtime, and keeps every pass predictable. The following steps guide you through a smooth, efficient workflow:
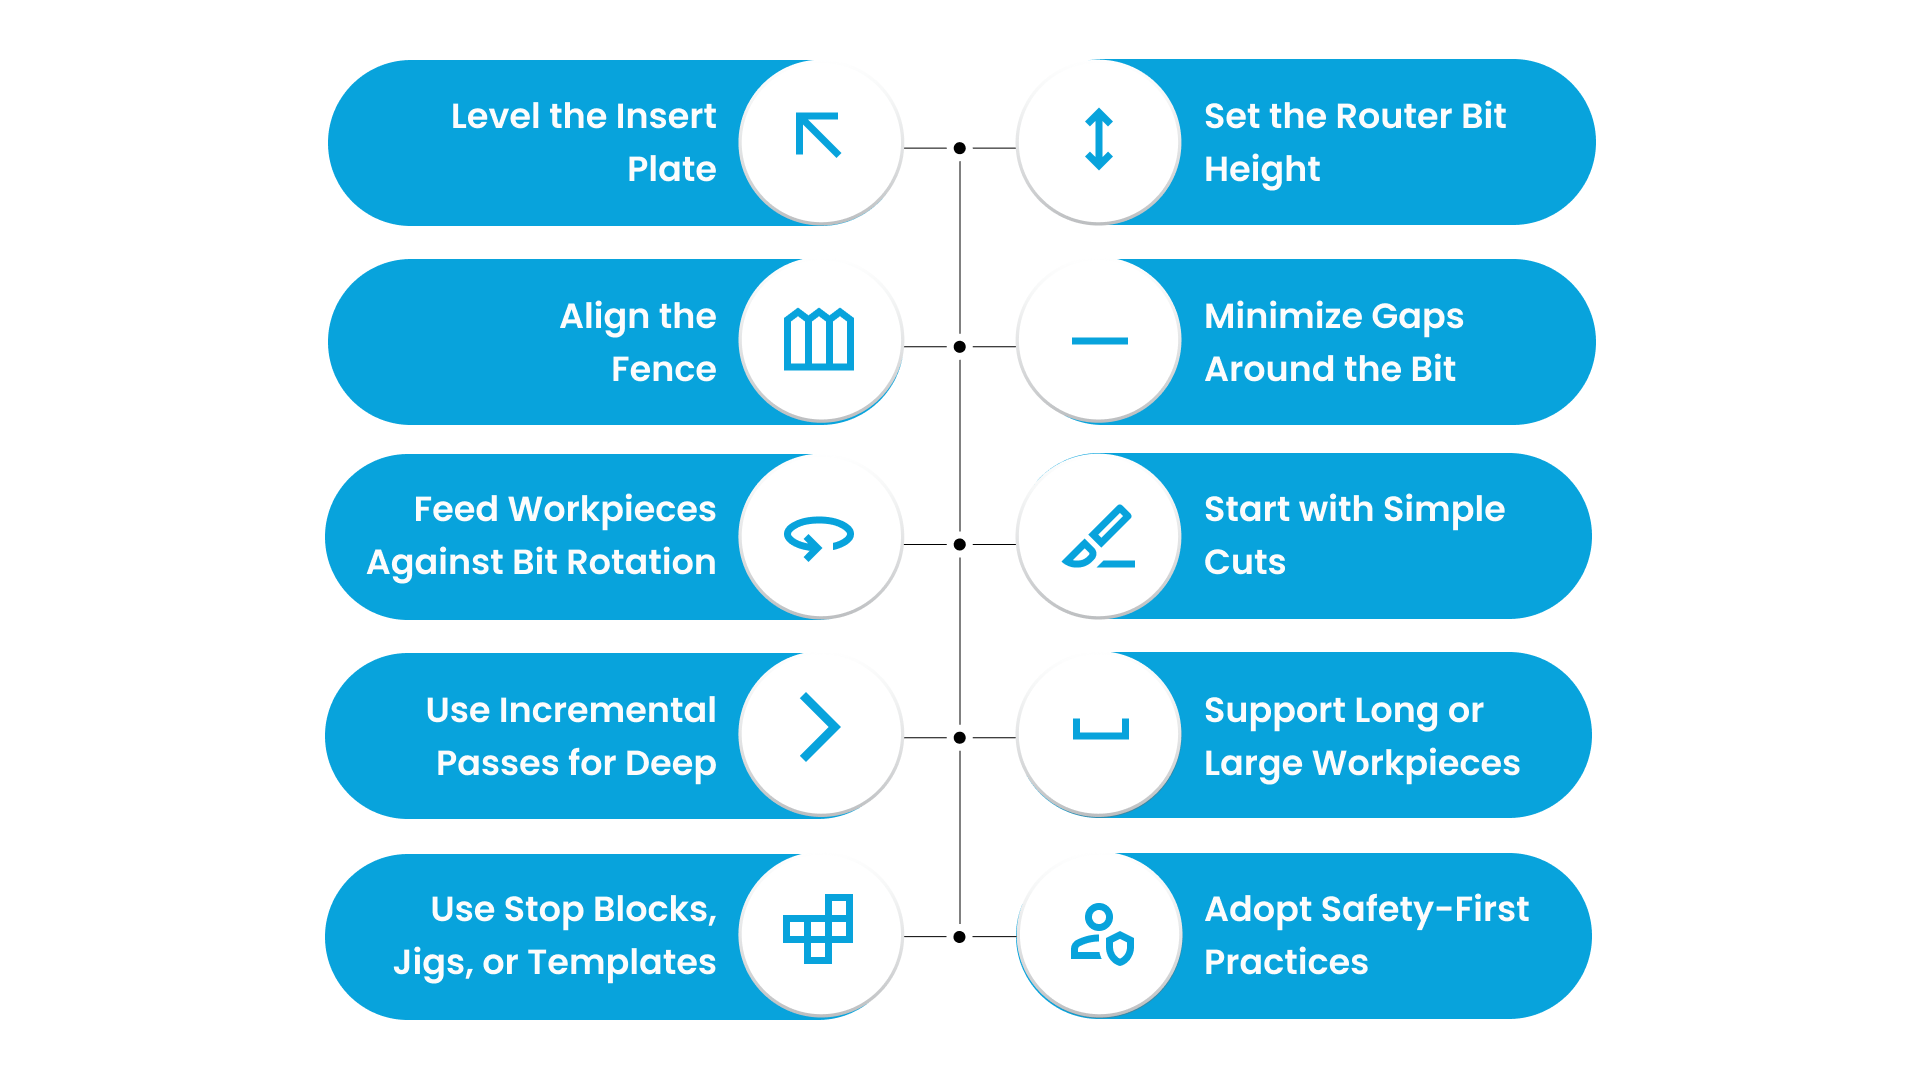
1. Level the Insert Plate
Start by ensuring the insert plate sits perfectly flush with the tabletop. A level plate provides a stable foundation, reduces variation during routing, and supports predictable feed across the workpiece.
Steps to Follow:
Place the insert plate and adjust screws or shims until it is perfectly flat.
Rotate the router bit by hand to confirm no contact with the table surface.
Recheck the plate periodically during extended use or after moving the table.
Importance: An uneven plate can cause the stock to catch or chatter, producing inconsistent cuts and increasing scrap or rework.
Challenges:
Small misalignments may seem minor but can amplify over long or repeated cuts.
Misaligned plates affect both the quality of the cut and operator control.
Advanced Tips:
Use a straightedge or gauge to verify level before every operation.
Inspect the plate after heavy use to ensure continued flatness.
2. Set the Router Bit Height
Once the insert plate is level, the next step is adjusting the router bit to the correct height. Proper bit height is essential for consistent, precise cuts and helps maintain workflow efficiency while reducing scrap.
Steps to Follow:
Gradually raise or lower the bit to reach the desired cutting depth.
Test the setting on scrap material to confirm proper feed and cut quality before moving on to actual stock.
Importance: If the bit height is off, it can produce overcuts or undercuts, resulting in defects, rework, and reduced throughput. Ensuring the correct height supports predictable, high-quality results and smoother operations.
Challenges:
Frequent adjustments can slow production and disrupt workflow.
Misjudged bit heights increase scrap rates and may affect consistency across multiple pieces.
Advanced Tips:
Record preferred bit heights for commonly used operations to reduce setup time in future runs.
Always test on scrap material before starting production to verify accuracy and avoid surprises during actual work.
Cutting Edge Plasma often feature integrated Bit Height Control (BHC), ensuring accurate cuts without repeated adjustments.
3. Align the Fence
After setting the bit height, the next critical step is positioning the fence accurately. Correct fence alignment guarantees straight, precise cuts and helps maintain consistent part dimensions while reducing material waste.
Steps to Follow:
Position the fence at the proper distance from the bit centerline.
Rotate the bit by hand to confirm there is sufficient clearance and proper alignment.
Lock the fence securely to prevent movement during operation.
Importance: A fence that is out of alignment can cause angled or uneven cuts, leading to rework, scrap, and disruptions in production flow. Accurate alignment ensures parts meet specifications consistently.
Challenges:
Small misalignments may become significant over longer workpieces.
Inconsistent fence positioning reduces repeatability and increases the chance of defects across multiple pieces.
Advanced Tips:
Use a straightedge or measuring tool to confirm precise positioning before cutting.
Recheck fence alignment regularly, especially after heavy use or if the table has been moved.
4. Minimize Gaps Around the Bit
Once the fence is aligned, attention should turn to reducing any gaps between the router bit and the insert plate. Closing these gaps helps prevent material snagging, kickback, and uneven edges, supporting safer and more precise operation.
Steps to Follow:
Install auxiliary inserts or rings to fill excess space around the bit.
Inspect carefully for any gaps that could catch the material during routing.
Importance: Excessive space around the bit increases the chance of tear-out or snagging, which can compromise both cut quality and operator safety. Maintaining a snug fit improves consistency and reduces corrective work.
Challenges:
Using small bits in wide openings may produce rough edges or unnecessary material waste.
Worn or damaged inserts reduce precision and can create safety hazards.
Advanced Tips:
Replace worn or damaged inserts promptly to maintain optimal performance.
Adjust inserts according to the bit diameter to ensure consistent, clean cuts across all operations.
5. Feed Workpieces Against Bit Rotation
With the fence and bit properly set, direct your attention to guiding the material correctly. Feeding the stock against the bit rotation improves control, ensures cleaner cuts, and lowers the risk of kickback.
Steps to Follow:
Always move the workpiece against the direction of the router bit.
Maintain a steady, controlled feed rate for each pass.
Importance: Feeding with the bit rotation reduces control, increases uneven edges, and raises the risk of accidents. Correct feed direction supports consistent results and operational efficiency.
Challenges:
Uneven feed speeds can produce rough or jagged edges.
Feeding in the wrong direction increases operator fatigue and potential workflow interruptions.
Advanced Tips:
Keep hands clear by using push sticks or featherboards.
Practice feed control on scrap material to build confidence and consistency before handling production pieces.
6. Start with Simple Cuts
Before tackling complex operations, begin with basic cuts to validate your setup and ensure consistent performance. Focusing on simple tasks first helps you maintain control and build confidence in your workflow.
Steps to Follow:
Start by testing edge profiling or simple grooves on scrap material.
Verify the fence alignment, feed speed, and bit performance to ensure everything is functioning correctly.
Importance: Starting with simple cuts reduces the likelihood of mistakes and helps prevent material waste. It also minimizes downtime caused by rework and establishes a predictable workflow for more advanced operations.
Challenges:
Jumping straight into complex cuts can lead to misaligned or defective parts.
Inexperience may compromise both the quality of the cut and operator safety.
Advanced Tips:
Progress gradually to more advanced cuts as your confidence and skill improve.
Document settings for commonly repeated cuts to save time and maintain consistent results in future operations.
7. Use Incremental Passes for Deep or Wide Cuts
When working on deep or wide cuts, it is important to remove material gradually to protect both the router and the bit. Breaking the cut into multiple passes ensures smoother, more precise results and reduces stress on your equipment.
Steps to Follow:
Start by taking shallow passes rather than attempting the full depth in a single cut.
Adjust the feed rate to match the depth of cut and the diameter of the bit for optimal control.
Importance: Attempting a deep cut in one pass can strain the router and bit, increasing wear and tear while raising the risk of tear-out or rough edges. Incremental cuts promote consistency and help maintain the quality of the finished workpiece.
Challenges:
Aggressive, single-pass cuts often lead to uneven edges, increased scrap, and potential rework.
They can also put unnecessary strain on the equipment, shortening tool life.
Advanced Tips:
Plan multiple passes for deeper or wider cuts to ensure smooth operation.
Regularly monitor the condition and temperature of the bit to maintain cutting quality and prevent premature wear.
8. Support Long or Large Workpieces
Handling long or large panels requires proper support because stable support maintains control, alignment, and consistent cut quality. Additionally, supporting the workpiece helps prevent tipping or wobbling, ensuring safer operation throughout the routing process.
Steps to Follow:
Place roller stands, bench extensions, or auxiliary supports along the length of the workpiece.
Make sure the stock stays flat and is firmly pressed against the fence while guiding it through the router.
Importance: Inadequately supported boards can shift or tilt, resulting in inaccurate cuts and increased risk of accidents. Reliable support helps maintain repeatable outcomes and reduces material waste.
Challenges:
Oversized or heavy stock is harder to manage without sufficient support, which can cause uneven cuts or scrap.
Misalignment during operation slows throughput and may require corrective work.
Advanced Tips:
Use stable roller stands, extended benches, or auxiliary supports for large panels.
Clamp or hold the stock securely against the fence to ensure accuracy and safe operation.
9. Use Stop Blocks, Jigs, or Templates
To enhance consistency and efficiency, employing jigs or templates ensures repeatable cuts, minimizes material waste, and speeds up production for recurring operations. Moreover, they reduce the risk of errors that can affect downstream processes.
Steps to Follow:
Set up jigs or templates for repeated shapes, grooves, or cuts.
Confirm alignment and ensure there is adequate clearance before routing to avoid collisions or miscuts.
Importance: Relying on freehand routing introduces variability, increases scrap, and leads to additional corrective work. Consistent use of jigs supports predictable outputs and operational efficiency.
Challenges:
Misaligned or improperly secured jigs can produce inconsistent parts.
Small errors compound over multiple operations, slowing production and increasing downtime.
Advanced Tips:
Standardize and clearly label jigs for frequent operations.
Keep templates organized and accessible to ensure quick and accurate setups for future projects.
10. Adopt Safety-First Practices
Finally, prioritizing safety ensures a secure and efficient workspace, protecting operators, reducing downtime, and supporting consistent cut quality. Additionally, following safety measures prevents defects and promotes reliable operations.
Steps to Follow:
Use push sticks, featherboards, and dust collection systems whenever necessary.
Maintain a clean, stable, and uncluttered workspace to avoid hazards.
Wear appropriate personal protective equipment, including goggles, hearing protection, and dust masks.
Importance: Ignoring safety practices increases the risk of injury, material damage, and unexpected downtime. Consistently applying safety measures safeguards both personnel and production outcomes.
Challenges:
Debris or poorly secured stock can cause kickback or produce defective cuts.
Operators may develop unsafe habits if safety checks are not performed routinely.
Advanced Tips:
Make safety inspections mandatory before each operation.
Train all personnel on correct tool handling and proper use of PPE to maintain a safe, productive environment.
3 Advanced Techniques for Skilled Operators
After understanding the essential setup and basic cuts, you can move on to more advanced techniques. These approaches allow skilled operators to handle complex tasks efficiently, maintain precision, and keep production consistent.
The table below highlights key advanced operations and their practical benefits:
Advanced Technique | Features | Impact |
Dado & Rabbet Cuts | Set fence/stop blocks, adjust bit height, test on scrap | Accurate joinery, tight tolerances, less rework |
Jigs & Patterns | Secure jig/template, check alignment, test | Consistent pieces, faster production, reduced scrap |
Switching Router Bits | Choose bit, install securely, check clearance | Allows versatile cuts, maintains precision across different profiles, reduces errors |
Strengthen Your Router Table Woodworking Setup with Cutting Edge Plasma
To make woodworking projects precise and hassle-free, Cutting Edge Plasma router systems are designed to simplify your workflow and deliver reliable results. They ensure accuracy, prioritize operator safety, and provide consistent performance for every project.
Here’s how our features help you work smoothly and guide you in how to use a router table woodworking effectively:
1. Integrated Bit Height Control (BHC)
The BHC keeps the router bit at a consistent level during every cut, giving clean edges and precise profiles. It’s perfect for uneven or warped wood, so you can maintain accuracy without constant adjustments.
2. BHC Anti-Dive
When working on corners, grooves, or intricate shapes, the Anti-Dive feature prevents the bit from plunging too deep. This protects your bits, ensures clean cuts, and keeps every detail accurate.
3. MyRouter CNC Motion Software
Compatible with Windows 11, this software lets you adjust feed rates, cut paths, offsets, and lead-ins without extra tools. All instructions are sent to the router controller before cutting, keeping your workflow smooth and minimizing mistakes.
4. Dust Collection System
Our built-in dust collection keeps your workspace clean, improves visibility, and reduces debris. This feature enhances safety and ensures every cut is precise.
5. Lifetime Tech Support and Warranty
We offer continuous support to help you operate your router table safely and efficiently. A one-year warranty covers electronics and workmanship, giving peace of mind during daily use.
With these features, you can simplify how to use a router table woodworking, work safely, reduce errors, and get consistent high-quality results. BHC, Anti-Dive, intuitive software, and a cleaner workspace make it easier to work confidently and efficiently.
Conclusion
At Cutting Edge Plasma, our router tables and woodworking solutions are designed to simplify these processes.
With stable surfaces, easy-to-adjust fences, and reliable construction, you can execute professional-quality cuts with confidence. Our tools help reduce errors, minimize material waste, and support consistent, high-quality results for every project.
Take your woodworking projects to newer heights today. Apply these best practices on how to use a router table efficiently, safely, and accurately to complete every project with precision.
Contact Cutting Edge Plasma to explore our range of router tables, expert guidance, and support for achieving flawless results every time.
FAQs
1. What’s the safest way to use a router table woodworking setup?
Wear protective gear, secure the workpiece, and follow correct routing direction and depth practices. Following safety protocols while learning how to use a router table woodworking ensures consistent cuts, protects your equipment, and reduces accidents.
2. Which router is best for beginners learning how to use a router table woodworking?
A fixed-base router is easier to control and ideal for starting woodworking projects. Choosing the right router makes it easier to achieve accurate cuts and safely practice how to use a router table woodworking.
3. How do I know when to replace router bits for router table woodworking?
Replace bits when they become dull, chipped, or damaged. Regular replacement supports clean cuts, prevents material waste, and helps you maintain smooth workflow while using a router table woodworking.
4. Can I make intricate or detailed cuts while learning how to use a router table woodworking?
Yes, using a plunge router and smaller bits allows grooves, patterns, and decorative edges. Proper setup and careful operation let you practice how to use a router table woodworking for precise and repeatable intricate cuts.
5. What techniques prevent tear-out when using a router table woodworking?
Use shallow passes, sharp bits, and move the wood against the bit’s rotation. Applying these techniques while learning how to use a router table woodworking ensures smooth edges and high-quality results.