That said, clean results aren't automatic. Achieving strong, consistent laser spot welds requires correct surface prep, dialed-in pulse parameters, and steady torch technique. Get any one of those wrong and you'll see burn-through, weak fusion, or oxidation — regardless of how good the machine is.
This guide covers the full process from setup to execution, the parameters that matter most, common failure modes, and when a different method makes more sense.
Key Takeaways
- Handheld laser welders spot weld by firing pulsed energy to a precise location — no electrode contact required
- Best suited for thin-gauge stainless steel, carbon steel, and aluminum under 4–6mm
- Surface contamination is the leading cause of porosity and weld failure — clean metal is the baseline for a sound weld
- Shielding gas selection is material-specific: nitrogen is common for stainless, argon for aluminum
- Always validate parameters on scrap before running production parts
How to Spot Weld Using a Handheld Laser Welding Machine
Step 1: Prepare Your Workpiece and Work Area
Surface cleanliness determines weld quality. TWI identifies grease, oil, oxide, absorbed water vapor, and cutting-fluid residues as causes of porosity in laser welds. Because laser spot welding concentrates all energy on a very small area, any contaminant in that zone compromises the weld nugget.
Prep sequence before welding:
- Wipe surfaces with a solvent (acetone or isopropyl alcohol) to remove oils and fingerprints
- Follow with light mechanical cleaning — wire brush or abrasive pad — to remove oxide or mill scale
- Wipe again with a clean solvent rag before clamping
Beyond cleaning, fit-up matters. Clamp or fixture pieces so the joint is flush with no gaps. Unlike seam welding, laser spot welding melts a localized area — even a small gap beneath the spot can result in a void rather than a solid nugget. Confirm your shielding gas is connected, flowing, and the nozzle covers the weld zone before triggering a single pulse.
Step 2: Configure Spot Welding Parameters
Select spot or pulse mode on the machine's control interface — this fires discrete pulses rather than a continuous beam, which is what creates individual weld spots instead of a seam.
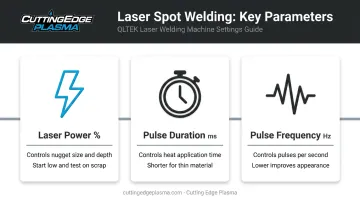
Three parameters control how much energy reaches each spot:
| Parameter | What It Controls | Adjustment Logic |
|---|---|---|
| Laser Power (%) | Peak energy per pulse — sets nugget size and depth | Start lower than you think; test on scrap at the same thickness |
| Pulse Duration (ms) | How long energy is applied per spot | Shorter = less heat input, ideal for thin material |
| Pulse Frequency (Hz) | Pulses per second in continuous trigger mode | Lower frequency improves appearance; higher increases speed but can increase spatter |
No universal parameter chart exists for all machines. Manufacturer-provided presets are your starting point — use them, then adjust based on test welds. Never assume settings from one material or thickness transfer to another.
Step 3: Execute the Spot Welds
Position the torch perpendicular to the workpiece at the standoff distance specified in your machine's manual. Consistency in angle and distance controls spot size and penetration depth.
Trigger technique for spot welding:
- Hold the torch stationary while the pulse fires — do not drag the torch
- Wait for the full pulse duration to complete before moving to the next location
- Maintain consistent spacing between spots; too close causes cumulative heat buildup and distortion, too far apart reduces joint strength
Moving the torch mid-pulse creates an elongated, inconsistent melt area rather than a discrete nugget — degrading both appearance and structural integrity. It's one of the most common errors new operators make.
Step 4: Inspect and Post-Weld Treatment
After welding, visually inspect each spot for:
- Uniform, bright appearance without spatter or pitting
- No discoloration on stainless (indicates oxidation from inadequate shielding gas)
- Consistent spot size across the joint
For corrosion-critical stainless applications, consider passivation treatment. The weld heat cycle affects the chromium oxide layer in the heat-affected zone. TWI notes that chromium-rich scale and chromium depletion in the HAZ can impair corrosion resistance; passivation restores it. Before running production parts, test a sample weld on scrap from the same batch and apply a peel or shear force to confirm the nugget holds.
Key Parameters That Affect Laser Spot Weld Quality
Every parameter in a laser spot weld interacts with the others. Changing one without compensating elsewhere produces inconsistent results. The three areas that matter most: power and pulse settings, wobble width, and shielding gas selection.
Laser Power and Pulse Settings
Peak power drives penetration depth. Pulse width adjusts energy per pulse. Together, they set the weld nugget size and heat input. AMADA's laser welding fundamentals describe the relationship directly: average power equals pulse energy multiplied by frequency — meaning higher frequency at the same pulse energy increases total heat input.
For thin stainless steel specifically, austenitic grades have thermal conductivity roughly one-third that of ferritic steel, with about 30% higher thermal expansion. That combination means heat builds faster and distortion risk is higher — a strong argument for shorter pulse durations and lower power percentages on thin stainless than you'd use on carbon steel of the same thickness.
Wobble Width and Shielding Gas
Many handheld laser welding heads include a wobble function that oscillates the beam in a circular or figure-8 pattern, widening the effective weld zone and helping bridge small fit-up gaps. Narrow wobble settings (0.5mm or less) concentrate heat tightly — best for thin material. Wider settings improve gap tolerance but raise heat input. Check your machine's documentation for recommended settings by material thickness.
Shielding gas selection depends on the base metal:
- Stainless steel: Nitrogen is common — it displaces oxygen and can slightly increase penetration; argon is suitable in specific cases
- Aluminum: Argon is the standard choice for most aluminum laser welding
- Carbon steel: Nitrogen is typical; argon can be considered if embrittlement is a concern
Flow rate matters as much as gas type. Too little leaves the weld exposed to oxygen; too much creates turbulence that pulls ambient air into the zone. Follow your machine manufacturer's recommended flow range for your nozzle configuration.
Common Mistakes and Troubleshooting
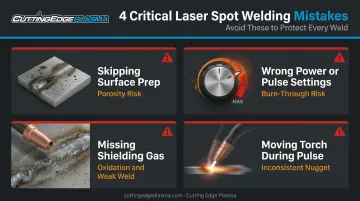
Four Mistakes That Cause Most Failures
- Skipping surface prep — even fingerprints cause porosity on a small weld spot; degrease and mechanically clean every time
- Wrong power or pulse settings for the material — settings for 2mm steel will burn through 0.8mm stainless on the first trigger pull; always test on same-material scrap
- Missing or mispositioned shielding gas — stainless without shielding gas produces an oxidized weld with compromised structural integrity
- Moving the torch during the pulse — creates an elongated, inconsistent melt zone rather than a discrete nugget
When failures do occur, matching the symptom to the fix gets you back on the workpiece faster.
Troubleshooting by Symptom
Burn-Through or Excessive Penetration
- Reduce power in 5–10% increments
- Shorten pulse on-time
- Verify torch standoff matches machine specification
- Retest on scrap before returning to the workpiece
Weak or Incomplete Fusion (Separates Under Light Force)
- Increase power slightly and extend pulse on-time
- Re-examine joint fit-up — eliminate gaps
- Re-clean the surface
- Check the protective lens in the weld head — a fouled lens scatters the beam and reduces energy at the spot
Surface Discoloration or Oxidation on Stainless
- Confirm shielding gas is flowing and check for kinks or blockages
- Reposition the nozzle to cover the weld zone
- Increase flow rate incrementally
- Ensure the surrounding surface is clean and dry
What You Need Before Getting Started
Equipment Requirements
Before your first spot weld, confirm you have these three essentials in place:
- A handheld fiber laser welder with a dedicated pulse/spot mode and enough wattage for your material thickness (underpowered machines won't reach adequate fusion depth)
- Shielding gas supply (argon or nitrogen depending on material) with regulator, flow meter, and compatible hose
- Filler wire matched to the base metal alloy, if the joint design requires it
Safety Requirements
Handheld fiber laser welders operate at approximately 1070nm infrared wavelength and are Class 4 devices. OSHA requires wavelength-appropriate eyewear with adequate optical density for all exposed operators.
Minimum PPE for handheld laser welding:
- Laser protection goggles or helmet rated OD 7+ at 1064–1070nm (ANSI Z87+ or EN207 rated)
- Heat-resistant gloves appropriate for the welding environment
- Local exhaust ventilation or fume extraction — mandatory for stainless steel work, where heat converts chromium to hexavalent chromium (Cr(VI)), a carcinogen with an OSHA PEL of 5 µg/m³ as an 8-hour TWA
Class 4 installations also require a designated laser-controlled area and a Laser Safety Officer under OSHA guidelines.
When to Use a Handheld Laser vs. Alternatives
Best Use Cases for Handheld Laser Spot Welding
- Thin-gauge stainless or aluminum assemblies (kitchen equipment, enclosures, brackets) where appearance matters
- Repair and maintenance on finished or assembled parts
- Small production runs where automated fixturing isn't cost-justified
- Applications where only one side of the joint is accessible
- Fabricators assembling plasma-cut parts who need to tack and hold position without distorting tight-tolerance geometry
When Another Method Makes More Sense
| Method | Better When | Key Trade-Off vs. Laser |
|---|---|---|
| Resistance Spot Welding | High-volume sheet overlap welds with easy electrode access on both sides | Faster per cycle in automation; but electrode wear, more heat spread, and no single-sided access |
| TIG Tack Welding | Thicker material, out-of-position work, or when filler metal is required and a TIG setup is already on hand | More heat input than laser — higher distortion risk on thin or precision parts |
| Robotic Laser Welding | High-volume, repeatable production runs — one case study found a remote laser cell produced 25 enclosures per hour vs. 6.9 per hour for manual spot welding | Capital cost of $50,000–$200,000+; not practical for low-volume, varied, or repair work |
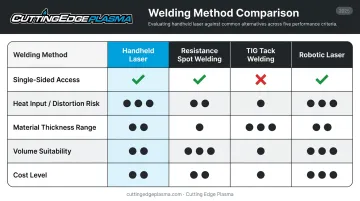
If your work involves varied part geometries, occasional repairs, or short runs where a robotic cell would sit idle most of the day, the handheld laser is the practical call.
Frequently Asked Questions
Do laser welders work on stainless steel?
Handheld fiber laser welders perform very well on stainless steel. Stainless requires shielding gas — nitrogen is commonly used — to prevent oxidation and discoloration. Power and pulse settings should be lower than for mild steel of the same thickness, since stainless has significantly lower thermal conductivity.
What does a spot welding machine for stainless steel cost?
Costs vary widely by technology: portable resistance spot welders start under $2,000, handheld fiber laser welders typically start around $22,000, and robotic laser welding cells run $50,000–$200,000+. Contact suppliers directly for current pricing, as configurations vary.
Can you use a handheld laser welder for spot welding on thin metal?
Handheld laser welders are particularly well-suited for thin material under 2mm. The pulsed spot mode concentrates energy precisely and limits heat spread, reducing distortion and burn-through risk compared to continuous welding or TIG tacking.
What shielding gas do I need for laser spot welding?
It depends on the material. Nitrogen is the most common choice for stainless steel and carbon steel; argon is standard for aluminum. Argon-helium blends are sometimes used for deeper penetration in specific applications. Always follow your machine manufacturer's gas and flow rate recommendations.
How does laser spot welding compare to resistance spot welding?
Laser spot welding requires access to only one side of the joint, leaves a smaller and less visible weld mark, handles thinner material without burn-through, and requires no electrode maintenance. Resistance spot welding is generally faster per cycle in high-volume automated production where both-sided electrode access is available.
What power settings should I use for laser spot welding?
Power settings depend on material type and thickness — there's no universal chart. Start from your machine manufacturer's recommended presets and validate on scrap material at the same thickness before running production welds.